03 Apr 2015
Following up on the previous list I did on configuration formats which
are used to execute code snippets,
I will try to summarize here some of the behaviors which are being
expressed in order to transparently modify the execution of something.
This time, I will divide into sections around how to express…
- execution chains
- IO redirection
- requirements & dependencies
- constraints
- resources
- liveness
- calls & rules
Execution Chains
The very basic functionality of task runners like make. In order
for something to be executed, first it must meet its prerequisites.
The most basic example of this is make:
some_binary: other.txt
	touch some_binary

other.txt:
	touch other.txt
And a similar example in Ant. Here jar needs to be called once
compile has succeeded in execution:
<target name="compile" description="compile the Java source code to class files">
    <mkdir dir="classes"/>
    <javac srcdir="." destdir="classes"/>
</target>
<target name="jar" depends="compile" description="create a Jar file for the application">
    <jar destfile="hello.jar">
        <fileset dir="classes" includes="**/*.class"/>
        <manifest>
            <attribute name="Main-Class" value="HelloProgram"/>
        </manifest>
    </jar>
</target>
IO Redirection
Sometimes it is needed to capture the output from a workload to
something with it. It could be only for inspection purposes (the
logging problem), or to trigger the execution of something else in
case it matches some condition (e.g. determining its liveness).
An example of this usage would be Gradle, which captures the output
from the command to trigger other actions (link)
// Link to SO question where this example belongs:
//
// http://stackoverflow.com/questions/11093223/how-to-use-exec-output-in-gradle
//
task setWhoamiProperty << {
    new ByteArrayOutputStream().withStream { os ->
        def result = exec {
            executable = 'whoami'
        }
        ext.whoami = os.toString()
    }
}

task setHostnameProperty << {
    new ByteArrayOutputStream().withStream { os ->
        def result = exec {
            executable = 'hostname'
        }
        ext.hostname = os.toString()
    }
}

task printBuildInfo(dependsOn: [setWhoamiProperty, setHostnameProperty]) {
    println whoami
    println hostname
}
A much more interesting example are the Continuum Semantic Pipelines,
which can create hooks in the connection so they can be actioned upon
by an event handler:
// Example from the Continuum docs here: http://docs.apcera.com/tutorials/pipelines/
  //
  if (req.body.Command.match(/DROP/i) || req.body.Command.match(/DELETE/i)) {
    // reject all drop and delete commands
    res.json({ Permitted: false, Reason: "No!" });
  } else {
    // permit anything else
    res.json({ Permitted: true, Reason: "Move along" });
  }
Requirements & Dependencies
These are conditions which must be met in order for the execution to succeed.
For example, we would like to express that a package should exists,
or that it should use a certain container image.
An example of how Aurora specifies that something should be run using
the python:2.7 docker container is below:
hello_world_proc = Process(
    name="hello_process",
    cmdline="""
while true; do
    echo -n "Hello world! The time is now: " && date
    sleep 10
done
""")

hello_world_docker = Task(
  name = 'hello docker',
  processes = [hello_world_proc],
  resources = Resources(cpu = 1, ram = 1*MB, disk=8*MB))

jobs = [
  Service(cluster = 'devcluster',
          environment = 'devel',
          role = 'docker-test',
          name = 'hello_docker',
          task = hello_world_docker,
          container = Container(docker = Docker(image = 'python:2.7')))]
Another example of this could be Puppet’s usage of require, before and
ensures (link), which reminds me a bit on the Hoare-style program verification (link).
file {'/tmp/test1':
  ensure  => present,
  content => "Hi.",
}

notify {'/tmp/test1 has already been synced.':
  require => File['/tmp/test1'],
}
Continuum also has its own package resolution functionality,
meaning that when creating a new package: (link)
depends  [ { os: "ubuntu" },
           { package: "build-essential" },
           { package: "git" },
           { package: "bzr" },
           { package: "mercurial" } ]

provides [ { runtime: "go" },
           { runtime: "go-1.3" } ]
Constraints
These are checks which happen to an execution which is ready
and determine the context on which the execution would be valid.
An example of this are the Marathon constraints. By using UNIQUE
for example, a command would be executed only once per hostname.
{
    "id": "sleep-unique",
    "cmd": "sleep 60",
    "instances": 3,
    "constraints": [["hostname", "UNIQUE"]]
}
This functionality is similar to Conflicts in CoreOS Fleet.
In Fleet, it is also possible to set Global, which in Marathon
translates to rack_id:GROUP_BY.
Resources
Besides having a proper environment to run, it will also need some
resources in the infrastructure like cpu, memory or disk required.
An extensive specfication of the resources that a workload may needs
can be found in the Kubernetes Resource Model
resources: [
  request:   [ cpu: 2.5, memory: "40Mi" ],
  limit:     [ cpu: 4.0, memory: "99Mi" ],
  capacity:  [ cpu: 12,  memory: "128Gi" ],
  maxusage:  [ cpu: 3.8, memory: "80Mi" ],
]
Some of the resources could be cpus, memory, storage and network related.
Liveness and Desired State
Once something is executed, we may want to define the health of a
workload to be able to either restart it or forcibly terminate it.
Kubernetes has the concept of probes to check whether something is ok or not.
livenessProbe:
  exec:
    command:
      - "cat"
      - "/tmp/health"
  initialDelaySeconds: 15
In the case of Marathon:
{
  "protocol": "COMMAND",
  "command": { "value": "curl -f -X GET http://$HOST:$PORT0/health" },
  "gracePeriodSeconds": 300,
  "intervalSeconds": 60,
  "timeoutSeconds": 20,
  "maxConsecutiveFailures": 3
}
Consul has its version of checks as well (link):
{
  "check": {
    "id": "api",
    "name": "HTTP API on port 5000",
    "http": "http://localhost:5000/health",
    "interval": "10s",
    "timeout": "1s"
  }
}
Continuum and Bazel both have timeout option meaning that if the
execution takes longer than the timeout parameter, then it is
stopped.
Bazel also provides flaky meaning that it will retry to execute 3
times before failing.
Calls & Rules
Many times the same resulting command will change
depending on the environment. In order to cope around this, it is
taken advantage the fact that we are using a configuration format to
have function like constructs which we can call.
For example, Ant defines the delete method to remote a file:
<delete file="hello.jar"/>
To put it in other words, it is calling a function named delete
which takes a $file as parameter, and then wrapping the portability
logic inside there.
In Bazel, we can see a similar concept in its rules. In the example
below, we pass 3 parameters when calling sh_binary:
sh_binary(
    name = "foo",
    srcs = ["foo.sh"],
    deps = ...,
    data = glob(["datafiles/*.txt"]),
)
Remarks
The coverage of this writing is not very extensive but hopefully it
serves to clarify a bit what are some of the common ways or patterns to modify the
execution of something. The list could go on and on, though next time
I see some new build or automation tool, I’ll make sure to check what
it is doing around the items that I described above.
EOF
31 Mar 2015
(or A list of things that run things. Also, this post is a bit long…)
I recently stumbled upon the following quote from Umberto Eco:
The list is the origin of culture. It’s part of the history of art and
literature. What does culture want? To make infinity
comprehensible. It also wants to create order — not always, but
often. And how, as a human being, does one face infinity? How does one
attempt to grasp the incomprehensible? Through lists, through
catalogs, through collections in museums and through encyclopedias and
dictionaries.
Inspired by it, I decided to try to make one about around
a topic that I care about a lot: how to specify how to run something.
The following is then, an enumeration of some systems or tools which
in the end result in the execution of a code block
by means of some configuration format, DSL, HTTP requests, CLI tool, etc…
I’ll use the term code block to imply that the code snippet is being
defined outside of the runtime where it is intended to be run.
Also I decided to narrow down to those in the list below,
and will be updating this post to cover them all eventually.
| Domain | Name |
| |
| Configuration Management | Chef, Puppet, Ansible |
| Infrastructure | Packer, Terraform, Cloud Init, NixOps |
| Isolation | Vagrant, Docker, CoreOS ACI |
| Workloads scheduling | Kubernetes, Marathon, Aurora, Heroku style, Fleet, Apcera Continuum, Consul checks |
| Continuous Integration | Jenkins, Drone.io, Travis, Wercker |
| Build tools, Task Runners | Make, Rake, Ant, Maven, Pants, Bazel, Gradle |
| SSH based deploy tools | Capistrano, Fabric |
Configuration Management
The purpose of these set of technologies is to make changes into a
server like installing packages, creating users, or creating
configuration files. A common theme in these tooling is that they
should be idempotent, meaning that each one of the commands will
have a check to verify whether the execution has been done already or
not, and abort if it has.
Chef
Chef has some resources which help in the execution of code blocks.
The configuration is driven by Ruby, which allows to not only having to rely
The following is based on the example found here. We have 2 code blocks
in this case. The first one creates a change in the server and the second one
checks whether that code block has been executed in the past already,
in order to make the resource idempotent.
%w{rover fido bubbers}.each do |pet_name|
  execute "feed_pet_#{pet_name}" do
    command "echo 'Feeding: #{pet_name}'; touch '/tmp/#{pet_name}'"
    # not_if { ::File.exists?("/tmp/#{pet_name}")}
    not_if "cat /tmp/#{pet_name} | grep Feeding"
  end
end
Puppet
- Uses: A special DSL
- Docs:
Puppet also tries to achieve idempotent runs of the code blocks.
According to the docs:
There are three main ways for an exec to be idempotent:
The command itself is already idempotent. (For example, apt-get update.)
The exec has an onlyif, unless, or creates attribute, which prevents Puppet from running the command unless some condition is met.
The exec has refreshonly => true, which only allows Puppet to run the command when some other resource is changed.
Here the execution is driven via a specialized DSL (though Ruby inspired?)
in order to make things declarative.
An example of its usage:
$my_file_arg = '/tmp/myarg.txt'

file { $my_file_arg:
  content => "Hello now",
}

exec {"Use $my_file_arg":
  require => File[$my_file_arg],
  command => "/bin/sed -i s/Hello/Bye/g $my_file_arg",
}
Here we have 2 types of code blocks:
- One expressing the contents of a file
- Another expressing the execution of a sed command
Ansible
Ansible uses YAML for its configuration.
Example from the docs
# Execute the command in remote shell; stdout goes to the specified
# file on the remote.
- shell: somescript.sh >> somelog.txt

# Change the working directory to somedir/ before executing the command.
- shell: somescript.sh >> somelog.txt chdir=somedir/

# You can also use the 'args' form to provide the options. This command
# will change the working directory to somedir/ and will only run when
# somedir/somelog.txt doesn't exist.
- shell: somescript.sh >> somelog.txt
  args:
    chdir: somedir/
    creates: somelog.txt
Here each one of the code blocks are executed by using the shell
configuration directive and then its execution is modified by setting
options like creates which will trigger an idempotency check and
abort the execution of the command if the file already exists.
Infrastructure
These days there are increasing number of possibilities
of Cloud APIs which streamline the acquisition of computing resources.
Though this also means that the number of layers has increased as well and thus
new types of configuration and declarative approaches need to be find
to orchestrate what we want to do with those resources.
Some use cases are like making calls to a cloud api like AWS, Google
Compute Engine, to get resources and chain the result to the
execution of a code block which furthers configures what we want to do
with the resource, or yet again persisting those changes back to
create a new type of resource (a new container or instance type for example.)
Packer
- Uses: JSON
- Documentation:
Packer counts with a shell provisioner.
The description from the website notes:
The shell Packer provisioner provisions machines built by Packer using
shell scripts. Shell provisioning is the easiest way to get software
installed and configured on a machine.
As an example, we can have JSON express what we want to do with the execution of the code block
{
  "type": "shell",
  "inline": ["echo foo"]
}
The execution of the remote resource then, is driven by the JSON format.
Here is a more complex example I could find, one that invokes Ansible.
"provisioners": [
  {
    "type": "shell",
    "inline": [
      "mkdir .ssh",
      "echo '{{user `public_key`}}' >> .ssh/authorized_keys"
    ]
  },
  {
    "type": "shell",
    "execute_command": "echo '{{user `ssh_pass`}}' | {{ .Vars }} sudo -E -S sh '{{ .Path }}'",
    "inline": [
      "add-apt-repository ppa:rquillo/ansible",
      "apt-get update",
      "apt-get install -y ansible",
      "echo '%sudo    ALL=(ALL)  NOPASSWD:ALL' >> /etc/sudoers"
    ]
  },
  {
    "type": "ansible-local",
    "playbook_file": "site.yml"
  }
]
Here the provisioners are chained sequentially.
One notable example is that we are now defining another sub code block named execute_command
which is prepended to the execution of the original code block.
To many new users, the execute_command is puzzling. However, it provides an important function: customization of how the command is executed. The most common use case for this is dealing with sudo password prompts.
Terraform
- Uses: The special Terraform format
- Docs:
Terraform is an interesting case since it recognizes the limitations
of using JSON and YAML to drive the execution of a provisioning run.
The following is an example of applying puppet, also taken from the docs.
# Run puppet and join our Consul cluster
resource "aws_instance" "web" {
    ...
    provisioner "remote-exec" {
        inline = [
        "puppet apply",
        "consul join ${aws_instance.web.private_ip}"
        ]
    }
}
Here we are expressing that there is going to be a computing resource
in AWS, and then when the resource is ready, the code block would be executed
in that environment.
Cloud Config and Cloud Init
Cloud config is an interesting case. Its execution is leveraged via Convention Over Configuration approach
where anything under a certain path will be executed on the node.
The execution in this case is driven by YAML as in Kubernetes.
Here is an example of using runcmd (example taken from here)
#cloud-config

# run commands
# default: none
# runcmd contains a list of either lists or a string
# each item will be executed in order at rc.local like level with
# output to the console
# - if the item is a list, the items will be properly executed as if
#   passed to execve(3) (with the first arg as the command).
# - if the item is a string, it will be simply written to the file and
#   will be interpreted by 'sh'
#
# Note, that the list has to be proper yaml, so you have to escape
# any characters yaml would eat (':' can be problematic)
runcmd:
 - [ ls, -l, / ]
 - [ sh, -xc, "echo $(date) ': hello world!'" ]
 - [ sh, -c, echo "=========hello world'=========" ]
 - ls -l /root
 - [ wget, "http://slashdot.org", -O, /tmp/index.html ]
NixOps
- Uses: Nix configuration format
- Docs:
NixOps is a super interesting solution! Here is the description that
can be found in the site:
NixOps is a tool for deploying NixOS machines in a network or
cloud. It takes as input a declarative specification of a set of
“logical” machines and then performs any necessary steps actions to
realise that specification: instantiate cloud machines, build and
download dependencies, stop and start services, and so on. NixOps has
several nice properties:
Here is an example of using it to setup Mediawiki and below is an
edited version of it. We can find that there is an installPhase
block, as well as an script whcih is used to prepare the postgres database.
  # !!! Cut&paste, extremely ugly.
  # Unpack Mediawiki and put the config file in its root directory.
  mediawikiRoot = pkgs.stdenv.mkDerivation rec {
    name= "mediawiki-1.15.5";

    src = pkgs.fetchurl {
      url = "http://download.wikimedia.org/mediawiki/1.15/${name}.tar.gz";
      sha256 = "1d8afbdh3lsg54b69mnh6a47psb3lg978xpp277qs08yz15cjf7q";
    };

    buildPhase = "true";

    installPhase =
      ''
        mkdir -p $out
        cp -r * $out
      '';
  };

  ...

  jobs.init_mediawiki_db =
    { task = true;
      startOn = "started postgresql";
      script =
        ''
          mkdir -p /var/lib/psql-schemas
          if ! [ -e /var/lib/psql-schemas/mediawiki-created ]; then
              ${pkgs.postgresql}/bin/createuser --no-superuser --no-createdb --no-createrole mediawiki
              ${pkgs.postgresql}/bin/createdb mediawiki -O mediawiki
              ( echo 'CREATE LANGUAGE plpgsql;'
                cat ${mediawikiRoot}/maintenance/postgres/tables.sql
                echo 'CREATE TEXT SEARCH CONFIGURATION public.default ( COPY = pg_catalog.english );'
                echo COMMIT
              ) | ${pkgs.postgresql}/bin/psql -U mediawiki mediawiki
              touch /var/lib/psql-schemas/mediawiki-created
          fi
        '';
    };

 ...

};
Isolation
(Note: Not sure if isolation would be right word for these.)
What these do is automate the creation of another environment
within another local environment by using virtualization or container technologies.
Vagrant
- Uses: A Ruby DSL (Vagrantfile)
- Docs:
Vagrant is a very popular tool which helps in the creation of local
virtual environments.
Vagrant uses a Vagrantfile to specify the configuration and
execution of code blocks within the created resource:
Vagrant.configure("2") do |config|
  config.vm.provision "shell", run: "always" do |s|
    s.inline = "echo hello"
  end
end
There is also a related push option, which can be used to code
blocks locally:
config.push.define "local-exec" do |push|
  push.inline = <<-SCRIPT
    scp . /var/www/website
  SCRIPT
end
Docker
- Uses: The Dockerfile format
- Docs:
Docker uses its own basic configuration format. Maybe due to the
nature of Docker layers, it emphasizes running one liners via its
RUN directive:
# Comment
RUN echo 'we are running some # of cool things'
But in the end, what will continue to run is what is defined in its
ENTRYPOINT:
FROM debian:stable
RUN apt-get update && apt-get install -y --force-yes apache2
EXPOSE 80 443
VOLUME ["/var/www", "/var/log/apache2", "/etc/apache2"]
ENTRYPOINT ["/usr/sbin/apache2ctl", "-D", "FOREGROUND"]
We can see that along with the execution of the code block, it is also being defined
the folders and port mapping that are required to execute the code block.
CoreOS Appc
The Application Container Specification uses JSON to define an
Image Manifest. The commands to execute are comma separated,
and there is a chain of execution via event handlers.
"app": {
       "exec": ["/usr/bin/reduce-worker", "--quiet"],
       "user": "100",
       "group": "300",
       "eventHandlers": [
           {
               "exec": [
                   "/usr/bin/data-downloader"
               ],
               "name": "pre-start"
           },
           {
               "exec": [
                   "/usr/bin/deregister-worker",
                   "--verbose"
               ],
               "name": "post-stop"
           }
       ],
       "workingDirectory": "/opt/work",
       "environment": [
           {
               "name": "REDUCE_WORKER_DEBUG",
               "value": "true"
           }
       ],
The specification of the resource that the workload would be using
can be found under the isolation key:
"isolators": [
            {
                "name": "resources/cpu",
                "value": {
                    "request": "250",
                    "limit": "500"
                }
            },
            {
                "name": "resource/memory",
                "value": {
                    "request": "1G",
                    "limit": "2G"
                }
            },
            {
                "name": "os/linux/capabilities-retain-set",
                "value": {
                    "set": ["CAP_NET_BIND_SERVICE", "CAP_SYS_ADMIN"]
                }
            }
        ],
Build tools and Task runners
These have the common functionality of chaining together
the execution of code blocks into steps, dependencies or
prerequisities.
Some of them also have notions of idempotency as the configuration management tooling.
The classic example of these tools I believe it would be make.
Make
- Uses: the Makefile format
- Docs:
Borrowing the example of Wikipedia as well:
Here is a simple makefile that describes the way an executable file
called edit depends on four object files which, in turn, depend on
four C source and two header files.
edit : main.o kbd.o command.o display.o
    cc -o edit main.o kbd.o command.o display.o

main.o : main.c defs.h
    cc -c main.c
kbd.o : kbd.c defs.h command.h
    cc -c kbd.c
command.o : command.c defs.h command.h
    cc -c command.c
display.o : display.c defs.h
    cc -c display.c

clean :
     rm edit main.o kbd.o command.o display.o
We invoke a code block using make clean, which will trigger the
execution of the clean code block. On the other hand,
Rake
From its description:
Rake is a Make-like program implemented in Ruby. Tasks and dependencies are specified in standard Ruby syntax.
A simple example from the docs:
The following file task creates a executable program (named prog)
given two object files name a.o and b.o.
The tasks for creating a.o and b.o are not shown.
file "prog" => ["a.o", "b.o"] do |t|
  sh "cc -o #{t.name} #{t.prerequisites.join(' ')}"
end
It is also possible to run the tasks in parallel:
multitask :highlight => FileList["listings/*"]

rule ".html" => ->(f){ FileList[f.ext(".*")].first } do |t|
  sh "pygmentize -o #{t.name} #{t.source}"
end
Ant
According to Wikipedia:
One of the primary aims of Ant was to solve Make’s portability problems.
Below is an example from the Wikipedia entry:
<?xml version="1.0"?>
<project name="Hello" default="compile">
    <target name="clean" description="remove intermediate files">
        <delete dir="classes"/>
    </target>
    <target name="clobber" depends="clean" description="remove all artifact files">
        <delete file="hello.jar"/>
    </target>
    <target name="compile" description="compile the Java source code to class files">
        <mkdir dir="classes"/>
        <javac srcdir="." destdir="classes"/>
    </target>
    <target name="jar" depends="compile" description="create a Jar file for the application">
        <jar destfile="hello.jar">
            <fileset dir="classes" includes="**/*.class"/>
            <manifest>
                <attribute name="Main-Class" value="HelloProgram"/>
            </manifest>
        </jar>
    </target>
</project>
Among the XML, we can see the tasks are chained together via depends.
To execute a script, there is an exec task, where each one of the
arguments to the command line are defined via an ordered list of arg tags:
<target name="help">
  <exec executable="cmd">
    <arg value="/c"/>
    <arg value="ant.bat"/>
    <arg value="-p"/>
  </exec>
</target>
Maven
Similar to Ant, an exec block in XML can be used:
<project>
  ...
  <build>
    <plugins>
      <plugin>
        ...
        <executions>
          <execution>
	    ...
            <configuration>
              <tasks>
                <exec
                  dir="${project.basedir}"
                  executable="${project.basedir}/src/main/sh/do-something.sh"
                  failonerror="true">
                  <arg line="arg1 arg2 arg3 arg4" />
                </exec>
              </tasks>
            </configuration>
	    ...
          </execution>
        </executions>
      </plugin>
    </plugins>
  </build>
</project>
Bazel
Bazel has great FAQ where it succintly explains the issues that Google
had delivering its software which resulted in the creation of the
original Blaze.
Quoting it:
What is Bazel best at?
Bazel shines at building and testing projects with the following properties:
- Projects with a large codebase
- Projects written in (multiple) compiled languages
- Projects that deploy on multiple platforms
- Projects that have extensive tests
What should I not use Bazel for?
Bazel tries to be smart about caching. This means it is a bad match
for build steps that should not be cached.
For example, the following steps should not be controlled from Bazel:
- A compilation step that fetches data from the internet.
- A test step that connects to the QA instance of your site.
- A deployment step that changes your site’s cloud configuration.
Bazel tries to minimize expensive compilation steps. If you are only using interpreted languages directly, such as JavaScript or Python, Bazel will likely not interest you.
Bazel has a large number of rules which define how to do the builds.
Here is an example of running a bash script for testing:
sh_test(
    name = "foo_integration_test",
    size = "small",
    srcs = ["foo_integration_test.sh"],
    deps = [":foo_sh_lib"],
    data = glob(["testdata/*.txt"]),
)
By specifying that the test is small so that is times out after 1 minute.
Pants
- Uses: Similar BUILD syntax as Bazel
- Docs:
Description from the site:
Pants is similar to make, maven, ant, gradle, sbt, etc.; but pants
pursues different design goals.
Pants optimizes for
- building multiple, dependent things from source
- building code in a variety of languages
- speed of build execution
Here is a very basic example from the readme.
python_tests(name='greet',
  dependencies=[
    'examples/src/python/example/hello/greet:greet',
    ':prep',
  ],
  sources=globs('*.py'),
)

# Prepare for the 'greet' test. Realistically, you wouldn't set up a
# prep_command just to create an emtpy temp file. This is meant as a
# simple example.
prep_command(name='prep',
  prep_executable='touch',
  prep_args=['/tmp/prep_command_result']
)
Gradle
- Uses: Groovy based DSL
- Docs:
According to Wikipedia:
Gradle was designed for multi-project builds which can grow to be
quite large, and supports incremental builds by intelligently
determining which parts of the build tree are up-to-date, so that any
task dependent upon those parts will not need to be re-executed.
In the Exec example, before executing the command,
it is defined the working directory where it should run
and more interesting, a stream that will capture the output.
task stopTomcat(type:Exec) {
  workingDir '../tomcat/bin'

  //on windows:
  commandLine 'cmd', '/c', 'stop.bat'

  //on linux
  commandLine './stop.sh'

  //store the output instead of printing to the console:
  standardOutput = new ByteArrayOutputStream()

  //extension method stopTomcat.output() can be used to obtain the output:
  ext.output = {
    return standardOutput.toString()
  }
}
Continuous Integration
CI tools help in automating the creation of build artifacts
and running of tests from a project. In a sense, one could say
that they are also schedulers as well, though specialized in the
domain of running tests and creating steps which result in a release (batches).
Jenkins
- Uses: HTML textareas or XML.
- Docs:
Jenkins is an established open source CI solution with a large number
of plugins, very extensible.
Although most of its usage would be through HTML forms,
there is a way to schedule Jenkins jobs via XML.
Meaning that it is XML, the environment will be a little bit more
unnatural than in other solutions since the code will have to be
escaped for example so that it includes entities which make it conform
valid XML.

Drone.io
- Uses: An HTML textarea and checkboxes
- Docs:
Via the UI, it is possible to specify the environment variables
and then within a text area write the script to be executed.

Travis
Travis is a great CI as a service solution, (which is also open source).
Configuration is done via a local .travis.yml file which is located
at the root of a repository directory. In the example of the docs below,
we have 2 code blocks, one that defines a list of install steps
which provision an environment so that the script code block is
executed successfully.
install:
  - bundle install --path vendor/bundle
  - npm install

script: bundle exec thor build
Wercker
From the docs:
The wercker.yml file is a configuration file that specifies how your build and deploy pipelines should be run and which steps should be executed in those pipelines.
And a full example below. As part of a Wercker build pipeline,
we can find a series of steps which will be run sequentially.
The box option defines the environment, and then code is used
to define the code block.
# use the default golang container from Docker Hub
box: golang
# The steps that will be executed in the build pipeline
build:
  steps:
    # golint step!
    - wercker/golint

    # Build the project
    - script:
        name: go build
        code: |
          go build ./...

    # Test the project
    - script:
        name: go test
        code: |
          go test ./...

# The steps that will be executed in the deploy pipeline
deploy:
    steps:
        # Execute the s3sync deploy step, a step provided by wercker
        - s3sync:
            key_id: $AWS_ACCESS_KEY_ID
            key_secret: $AWS_SECRET_ACCESS_KEY
            bucket_url: $AWS_BUCKET_URL
            source_dir: build/
SSH based deploy tools
What these tool do is automate the remote (possibly parallel)
execution of commands in a number of servers.
Capistrano
With Capistrano we can define a list of servers where we want to
execute a task (defined with :execute).
server 'example.com', roles: [:web, :app]
server 'example.org', roles: [:db, :workers]
desc "Report Uptimes"
task :uptime do
  on roles(:all) do |host|
    execute :any_command, "with args", :here, "and here"
    info "Host #{host} (#{host.roles.to_a.join(', ')}):\t#{capture(:uptime)}"
  end
end
Fabric
Similar to Capistrano, here we define a list of the servers and then
use a command line tool to execute actions on them.
from fabric.api import run, env

env.hosts = ['host1', 'host2']

def taskA():
    run('ls')

def taskB():
    run('whoami')
Workloads scheduling
Once having defined the infrastructure that is is desired, maybe by building upon
the technologies in the list above, it is possible to
create another abstraction around the computing resources so that
those running a workload can focus on how something should be executed
rather than than detailing how to prepare the necessary infrastructure
so that the workload runs. These tools are usually referred to as
PaaS systems or some of them with more simple features are just
considered Schedulers. Thanks to Mesos, there is an increasing
number of these so only covering some of them.
Kubernetes
In the case of Kubernetes, the execution is driven via a YAML file.
A couple of examples below:
Example: An Nginx service
- Explicitly say it is a
Service
- Describe the ports it will use
- Set a constraint about where to run the service
kind: Service
apiVersion: v1beta1
id: nginx-example
# the port that this service should serve on
port: 8000
# just like the selector in the replication controller,
# but this time it identifies the set of pods to load balance
# traffic to.
selector:
  name: nginx
# the container on each pod to connect to, can be a name
# (e.g. 'www') or a number (e.g. 80)
containerPort: 80
Not very clear what it is running, but it seems that
an internal containerport will be exposed as the port 8000
and that it will only be running in nodes tagged to be running nginx workloads.
The full example is here.
Example: A workload with a Healthcheck
Here we have a container that has a livenessProbe,
which can be done by either a command or a http request.
There are 2 code blocks: the liveness-exec which is going to be
periodically writing ok into /tmp/health and its liveness probe,
which is another code block that will be checking cat /tmp/health
apiVersion: v1beta1
desiredState:
  manifest:
    containers:
      - image: busybox
        name: liveness
        livenessProbe:
          exec:
            command:
              - "cat"
              - "/tmp/health"
          initialDelaySeconds: 15
        command:
          - "/bin/sh"
          - "-c"
          - "echo ok > /tmp/health; sleep 10; echo fail > /tmp/health; sleep 600"
    id: liveness-exec
    version: v1beta1
id: liveness-exec
kind: Pod
labels:
  test: liveness
We can see some of the limitations already in deciding to use YAML
for this since it looks unnatural that now a command has to be
break apart and fit into an array structure by using YAML lists.
Marathon
In Marathon, scheduling of workloads is done via JSON payloads done to an HTTP API.
Here is an example of starting a couple of code blocks,
one which does a healthcheck and another one which is the job itself.
{
  "id": "bridged-webapp",
  "cmd": "python3 -m http.server 8080",
  "cpus": 0.25,
  "mem": 64.0,
  "instances": 2,
  "container": {
    "type": "DOCKER",
    "docker": {
      "image": "python:3",
      "network": "BRIDGE",
      "portMappings": [
        { "containerPort": 8080, "hostPort": 0, "servicePort": 9000, "protocol": "tcp" },
        { "containerPort": 161, "hostPort": 0, "protocol": "udp"}
      ]
    }
  },
  "healthChecks": [
    {
      "protocol": "HTTP",
      "portIndex": 0,
      "path": "/",
      "gracePeriodSeconds": 5,
      "intervalSeconds": 20,
      "maxConsecutiveFailures": 3
    },
    {
      "protocol": "COMMAND",
      "command": { "value": "curl -f -X GET http://$HOST:$PORT" },
      "gracePeriodSeconds": 5,
      "intervalSeconds": 20,
      "maxConsecutiveFailures": 3
    }

  ]
}
Via the JSON configuration we are able to say transparently modify the execution of the code block and express
that it should be done using a runtime which has python:3 and a certain number of ports open.
For the healthcheck code block, it is defined the path and one liner that should be executed
to consider that the other job is healthy or not. It is also expressed that after 3 failures
something would happen, though not expressed explicitly in the configuration.
Aurora
Aurora is another Mesos based scheduler to execute code blocks.
An example from the docs is below.
pkg_path = '/vagrant/hello_world.py'

# we use a trick here to make the configuration change with
# the contents of the file, for simplicity.  in a normal setting, packages would be
# versioned, and the version number would be changed in the configuration.
import hashlib
with open(pkg_path, 'rb') as f:
  pkg_checksum = hashlib.md5(f.read()).hexdigest()

# copy hello_world.py into the local sandbox
install = Process(
  name = 'fetch_package',
  cmdline = 'cp %s . && echo %s && chmod +x hello_world.py' % (pkg_path, pkg_checksum))

# run the script
hello_world = Process(
  name = 'hello_world',
  cmdline = 'python hello_world.py')

# describe the task
hello_world_task = SequentialTask(
  processes = [install, hello_world],
  resources = Resources(cpu = 1, ram = 1*MB, disk=8*MB))

jobs = [
  Service(cluster = 'devcluster',
          environment = 'devel',
          role = 'www-data',
          name = 'hello_world',
          task = hello_world_task)
]
The Aurora documentation has a helpful section regarding about what is
being defined in the example:
What’s Going On In That Configuration File?
More than you might think.
From a “big picture” viewpoint, it first defines two Processes. Then it defines a Task that runs the two Processes in the order specified in the Task definition, as well as specifying what computational and memory resources are available for them. Finally, it defines a Job that will schedule the Task on available and suitable machines. This Job is the sole member of a list of Jobs; you can specify more than one Job in a config file.
At the Process level, it specifies how to get your code into the local sandbox in which it will run. It then specifies how the code is actually run once the second Process starts.
Fleet
- Uses: Same style as
Systemd
- Docs:
The CoreOS guide has a good example of how to modify how to run a
container on it:
[Unit]
Description=My Apache Frontend
After=docker.service
Requires=docker.service

[Service]
TimeoutStartSec=0
ExecStartPre=-/usr/bin/docker kill apache1
ExecStartPre=-/usr/bin/docker rm apache1
ExecStartPre=/usr/bin/docker pull coreos/apache
ExecStart=/usr/bin/docker run -rm --name apache1 -p 80:80 coreos/apache /usr/sbin/apache2ctl -D FOREGROUND
ExecStop=/usr/bin/docker stop apache1

[X-Fleet]
Conflicts=apache@*.service
By using ExecStartPre, the lines from a code block will accumulate
and executed before running the container which has an Apache service.
It is also specified that such code block should not be run in the
same machine by using the Conflicts option (more options here).
Heroku
- Uses: Procfiles and Buildpacks
- Docs:
Actually is no longer just a hosting option, but a set of practices
which inspired other technologies like Flynn, Deis.io, Dokku and Cloudfoundry.
In case of Flynn, the code block execution is done via Procfiles (link).
A Procfile based application modifies the execution of a code block by
prepending a tag to the start command. For example:
$ cat Procfile
web: node web.js
In order to modify the environment of where that command would be run,
buildpacks are used. This is done by calling 3 possible other code
blocks: detect, compile and release (docs).
detect sends to stdout the type of applicationcompile makes changes to the environment which will persisted
for code blocks which will be run in the same environment later on.release communicates YAML back to the scheduler for later reuse
For example, from the Clojure buildpack:
cat <<EOF
---
config_vars:
default_process_types:
  web: lein trampoline run
EOF
Atlas
Atlas is a gestalt of all the products from Hashicorp which
in the end runs a workload on a specified infrastructure.
Below is an example of how something is run (taken from the docs
here).
{
    "builders": [{
        "type": "amazon-ebs",
        "access_key": "ACCESS_KEY_HERE",
        "secret_key": "SECRET_KEY_HERE",
        "region": "us-east-1",
        "source_ami": "ami-de0d9eb7",
        "instance_type": "t1.micro",
        "ssh_username": "ubuntu",
        "ami_name": "atlas-example {{timestamp}}"
    }],
    "push": {
      "name": "<username>/example-build-configuration"
    },
    "provisioners": [
    {
        "type": "shell",
        "inline": [
            "sleep 30",
            "sudo apt-get update",
            "sudo apt-get install apache2 -y"
        ]
    }],
    "post-processors": [
      {
        "type": "atlas",
        "artifact": "<username>/example-artifact",
        "artifact_type": "aws.ami",
        "metadata": {
          "created_at": "{{timestamp}}"
        }
      }
    ]
}
Apcera Continuum
- Uses: Same configuration format as
gnatsd
- Docs:
Continuum is one of my favorite platforms today. It is very
futuristic, waaaay ahead of anything else that exists today.
Not only is it possible to specify directives to modify how
something is run, it is possible to script the interactions
from the platform itself!
To define what is being executed or packaged (example),
build blocks are used:
environment { "PATH":    "/opt/apcera/go1.3.linux-amd64/bin:$PATH",
              "GOROOT":  "/opt/apcera/go1.3.linux-amd64",
              "GOPATH":  "/opt/apcera/go" }

build (
      export GOPATH=/opt/apcera/go
      (
            sudo mkdir -p $GOPATH
            sudo chown -R `id -u` $GOPATH
            cd $GOPATH
            mkdir -p src bin pkg
      )
      export INSTALLPATH=/opt/apcera/go1.3.linux-amd64
      tar -zxf go1.3.linux-amd64.tar.gz
      sudo mkdir -p ${INSTALLPATH}
      sudo cp -a go/. ${INSTALLPATH}

      # Install godeps
      export PATH=$INSTALLPATH/bin:$PATH
      export GOROOT=$INSTALLPATH
      go get github.com/apcera/godep
)
And for the execution of a code block, options like start_cmd
and resources are used.
# The command to start the app. If unset the stager will
# attempt to auto detect the start command based on the
# app framework used.
start_cmd: "bundle exec rackup config.ru -p $PORT"

# Resources allocated to the job.
resources {
  # CPU allocated to the job. Calculated in ms/s.
  # Default: 0, uncapped
  cpu: "0"

  # Disk space to allow for the application.
  # Default: 1024MB
  disk_space: "768MB"

  # Memory the job can use.
  # Default: 256MB
  memory: "256MB"

  # Network bandwidth allocated to the job.
  # Default: 5Mbps
  network_bandwidth: "10Mbps"
}
Also interesting is that the platform makes it possible to parameterize
files providing info about how the file is being run.
In the example below, uuid and name is information that comes
directly from the platform.
  # Link: https://github.com/apcera/continuum-sample-apps/blob/master/example-ruby-manifest/app.rb#L18
  get "/template" do
    "scalars:<br />
uuid: {{uuid}}<br />
name: {{name}}<br />
num_instances: {{num_instances}}<br />
cpu: {{cpu}}<br />
memory: {{memory}}<br />
disk: {{disk}}<br />
...*edited*...
"
  end
Cron
- Uses: Cron configuration format
Just for completeness, the classic cron syntax. From Wikipedia:
The following specifies that the Apache error log clears at one minute
past midnight (00:01) of every day of the month, or every day of the
week, assuming that the default shell for the cron user is Bourne
shell compliant:
1 0 * * * printf > /var/log/apache/error_log
Consul
More like an honorable mention, Consul for doing monitoring also
periodically executes checks (similar to the liveness probes
functionality from Kubernetes for example). It is interesting
that Hashicorp decoupled the healthchecks from other parts of their solution.
{
  "checks": [
    {
      "id": "chk1",
      "name": "mem",
      "script": "/bin/check_mem",
      "interval": "5s"
    },
    {
      "id": "chk2",
      "name": "/health",
      "http": "http://localhost:5000/health",
      "interval": "15s"
    },
    {
      "id": "chk3",
      "name": "cpu",
      "script": "/bin/check_cpu",
      "interval": "10s"
    },
    ...
  ]
}
Remarks
Again, what I found interesting of all of these systems and tooling,
is that they are variations around the same idea: wrap some configuration
around the execution of a code block to transparently add some behavior
to its execution.
It is impressive that there are so many different takes on this issue
even though that in essence what is happening is more or less the
same.
As an alternative, see for example what is being done in the
Jepsen tests, where there are no code blocks and they have been
assimilated into the code itself.
(defn db []
  (let [running (atom nil)] ; A map of nodes to whether they're running
    (reify db/DB
      (setup! [this test node]
        ; You'll need debian testing for this, cuz etcd relies on go 1.2
        (debian/install [:golang :git-core])

        (c/su
          (c/cd "/opt"
                (when-not (cu/file? "etcd")
                  (info node "cloning etcd")
                  (c/exec :git :clone "https://github.com/coreos/etcd")))

          (c/cd "/opt/etcd"
                (when-not (cu/file? "bin/etcd")
                  (info node "building etcd")
                  (c/exec (c/lit "./build"))))
Something to note as well is that there is a spectrum and repeated
functionality among the tools, e.g. chaining, a task that is executed after
other task, or piping the output from a command somehow to wrap some
logic around it, which makes me think whether eventually there will be
some tool which picks up the best parts from them and offers the
same functionality in an agnostic way somehow.
EOF
25 Feb 2015
One of the things that I left pending from my stay at
HackerSchool, was to combine a couple of the technologies
that have caught most of my attention: Mesos and Org mode.

Although I’m a big fan of the literate programming and active documents
that Org Babel enables for Emacs there are some limitations in the way
it does it. It works perfectly for local runs to get the results in
place within Emacs, but it does not work very well for long running
processes:
#+BEGIN_SRC sh
while true; echo "hanging the Emacs session :P"; done
#+END_SRC
Also in case you want to run a code block remotely,
you need to do it via ssh. Combining this with #+call blocks is
still very cool though:
#+name: install-emacs
#+BEGIN_SRC sh :dir /ubuntu@192.168.0.7:/home/ubuntu
sudo apt-get update
sudo apt-get install -y emacs24-nox org-mode
#+END_SRC

#+call: install-emacs() :dir /ubuntu@192.168.0.8:/home/ubuntu
#+call: install-emacs() :dir /ubuntu@192.168.0.9:/home/ubuntu
For some cases, like provisioning and installing packages (usually the
domain of tools like Chef, Puppet, Ansible, etc…) this may work
well, but for running jobs remotely we still have the same issue
of the session hanging and running the code blocks sequentially:
#+name: run-remotely
#+BEGIN_SRC sh :dir /ubuntu@192.168.0.7:/home/ubuntu
while true; do echo "called sequentially, blocks, not really what we want"; done
#+END_SRC

#+call: run-remotely() :dir /ubuntu@192.168.0.8:/home/ubuntu
#+call: run-remotely() :dir /ubuntu@192.168.0.9:/home/ubuntu
Not only that though, we also have to specify both the credentials
and resources that we are using for running the workloads.
Luckily, that is an area where Mesos really shines.
Implementation using the Mesos Go bindings
Mesos with its level of indirection approach, exposes a set of APIs
that we can rely on to be able to write custom schedulers in a
different runtime. The mesos-go bindings seem in actively development
in particular, so I decided to base on those to write the scheduler.
Then, another thing we need is something which can understand Org mode
documents, for this I implemented a basic parser of Org mode in Go
which can be loaded by the scheduler to orchestrate the run.
Using the Go bindings, we start defining our scheduler:
type OrgBabelScheduler struct {
	tasksLaunched int
	tasksFinished int
	blocks        []*org.OrgSrcBlock
}
And below is a a basic example of how the ResourceOffers handle
would look. Once having loaded the contents of the Org mode document,
we will be inspecting the content of the code block its header
arguments to procure the resources we want:
func (sched *OrgBabelScheduler) ResourceOffers(driver sched.SchedulerDriver, offers []*mesos.Offer) {

    // We will get many resource offerings,
    // but sometimes the resources being offered will not be enough
    // so we will need to implement backing off in case that happens.
    for _, offer := range offers {

        ...

        var tasks []*mesos.TaskInfo

        for _, src := range sched.blocks {
                sched.tasksLaunched++

                taskId := &mesos.TaskID{
                        Value: proto.String(strconv.Itoa(sched.tasksLaunched)),
                }

                // Should build the command properly depending of the runtime
                // Currenty only sh supported, but good enough
                // since I can just call the runtime from there
                cmd := src.RawContent

                fmt.Println("[OFFER ] Executing this code block:", src.Name, src.Headers)

                // The code block specifies the resources it should allocate
                //
                taskCpus := MIN_CPUS_PER_TASK
                if src.Headers[":cpus"] != "" {
                  taskCpus, _ = strconv.Atoi(src.Headers[":cpus"])
                }

                taskMem := MIN_MEM_PER_TASK
                if src.Headers[":mem"] != "" {
                  taskMem, _ = strconv.Atoi(src.Headers[":mem"])
                }

                task := &mesos.TaskInfo{
                        Name:     proto.String("ob-mesos-" + taskId.GetValue()),
                        TaskId:   taskId,
                        SlaveId:  offer.SlaveId,
                        // Executor: sched.executor,
                        Resources: []*mesos.Resource{
                                util.NewScalarResource("cpus", float64(taskCpus)),
                                util.NewScalarResource("mem", float64(taskMem)),
                        },
                        Command: &mesos.CommandInfo{
                                Value: proto.String(cmd),
                        },
                }

                // Run within a Docker container if :dockerimage is specified
                //
                if len(src.Headers[":dockerimage"]) > 0 {
                        task.Container = &mesos.ContainerInfo{
                                Type: mesos.ContainerInfo_DOCKER.Enum(),
                                Docker: &mesos.ContainerInfo_DockerInfo{
                                        Image: proto.String(src.Headers[":dockerimage"]),
					// ...
                                },
                        }
                }

                fmt.Printf("[OFFER ] Prepared to launch task:%s with offer %s \n", task.GetName(), offer.Id.GetValue())

                tasks = append(tasks, task)
        }
        fmt.Println("[OFFER ] Launching ", len(tasks), "tasks for offer", offer.Id.GetValue())
        driver.LaunchTasks([]*mesos.OfferID{offer.Id}, tasks, &mesos.Filters{RefuseSeconds: proto.Float64(1)})
    }
}
Full source of the implementation can be found here, written in
literate programming with Org mode of course..
Basic usage example: Running two commands in parallel
A basic example, would be something like this:
#+title: Example of running Org Babel workloads on Mesos

*** Mesos settings

#+address: 192.168.0.7
#+master:  192.168.0.7:5050

*** Code blocks

#+name: hello-mesos
#+header: :cpus 2 :mem 128
#+BEGIN_SRC sh
while true; do
  echo "hello world from Org Babel!!!"
  sleep 1
done
#+END_SRC

#+name: date-example
#+header: :cpus 2 :mem 256
#+BEGIN_SRC sh
while true; do
  echo "Telling the time!"
  date
  sleep 1
done
#+END_SRC
Here, I am defining 2 code blocks, allocating 2 cpus to each.
Also the second one will have a bit more memory than the other one.
Only Mesos related configuration that we need is the location of a
Mesos master and the ip address of the server from where we are
running the scheduler.
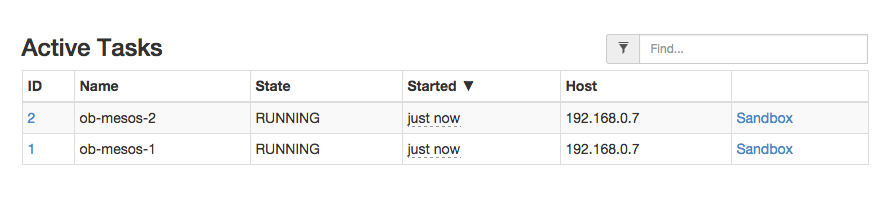
Results
The end result of this experiment looks like this:
$ go run examples/org_scheduler.go -f org/job.org -logtostderr=true

...
[REGIST] Framework Registered with Master  &MasterInfo{Id:*20150225-084641-117483712-5050-23902,Ip:*117483712,Port:*5050,Pid:*master@192.168.0.7:5050,Hostname:*192.168.0.7,XXX_unrecognized:[],}
[OFFER ] offerId = 20150225-084641-117483712-5050-23902-O60 , cpus = 4 , mem = 2812
[OFFER ] Executing this code block: hello-mesos map[:procs:5 :cpus:2 :mem:128]
[OFFER ] Prepared to launch task:ob-mesos-1 with offer 20150225-084641-117483712-5050-23902-O60
[OFFER ] Executing this code block: date-example map[:cpus:2 :mem:256]
[OFFER ] Prepared to launch task:ob-mesos-2 with offer 20150225-084641-117483712-5050-23902-O60
[OFFER ] Launching  2 tasks for offer 20150225-084641-117483712-5050-23902-O60
[STATUS] task 1  is in state  TASK_RUNNING
[STATUS] task 2  is in state  TASK_RUNNING
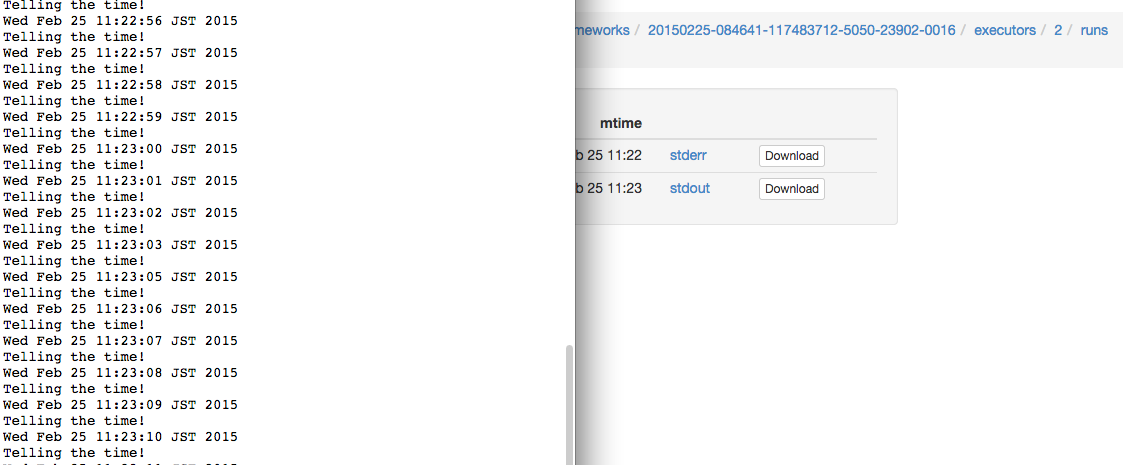
We can also check the logs within the Mesos slave sandbox:
Containerizer usage example: Running a command within a Docker container
Thanks to the built-in Docker containerizer from Mesos,
it would also be possible to specify a Docker image so
that the command gets executed within a container.
In this example, the first block will specify the entrypoint and set
:dockerimage redis so that the redis image is pulled and ran.
Then the second one will be using that redis container and updating a timestamp.
#+title:   Org + Docker + Mesos + Redis Example
#+address: 192.168.0.7
#+master:  192.168.0.7:5050

Here is a redis server, we can define the entrypoint to be used
within the Docker image via an Org Babel block:

#+name: redis-server
#+header: :cpus 2 :mem 512 :dockerimage redis
#+BEGIN_SRC sh
redis-server
#+END_SRC

In parallel, there will be another job running
which will be setting the time in the redis server:

#+name: set-time-in-redis
#+header: :cpus 2 :mem 256
#+BEGIN_SRC sh
while true; do
  echo "SET time `date '+%s'`" | nc 127.0.0.1 6379
  sleep 1
done
#+END_SRC
Results
Output would be:
[OFFER ] offerId = 20150225-174751-117483712-5050-13334-O1376 , cpus = 4 , mem = 2812
[OFFER ] Executing this code block: redis-server map[:mem:512 :dockerimage:redis :cpus:2]
[OFFER ] Prepared to launch task:ob-mesos-1 with offer 20150225-174751-117483712-5050-13334-O1376
[OFFER ] Executing this code block: set-time-in-redis map[:mem:256 :cpus:2]
[OFFER ] Prepared to launch task:ob-mesos-2 with offer 20150225-174751-117483712-5050-13334-O1376
[OFFER ] Launching  2 tasks for offer 20150225-174751-117483712-5050-13334-O1376
[STATUS] task 2  is in state  TASK_RUNNING
[STATUS] task 1  is in state  TASK_RUNNING
[OFFER ] offerId = 20150225-174751-117483712-5050-13334-O1377 , cpus = 0 , mem = 2044
And we can also confirm that it has been run by the Docker engine:
sudo docker ps

CONTAINER ID        IMAGE               COMMAND                CREATED             STATUS              PORTS               NAMES
1a8b3c964c3e        redis:latest        "\"/bin/sh -c redis-   17 minutes ago      Up 17 minutes                           mesos-88de0870-b613-4bda-9ed4-30995834ccab
and that a timestamp has been set:
telnet 127.0.0.1 6379

Trying 127.0.0.1...
Connected to 127.0.0.1.
Escape character is '^]'.
get time
$10
1424882889
We can also check the logs within the sandbox:
==> /tmp/mesos/slaves/20150223-223304-117483712-5050-29395-S0/frameworks/20150225-174751-117483712-5050-13334-0018/executors/1/runs/88de0870-b613-4bda-9ed4-30995834ccab/stdout <==
[8] 25 Feb 16:25:07.322 # Warning: no config file specified, using the default config. In order to specify a config file use redis-server /path/to/redis.conf
                _._
           _.-``__ ''-._
      _.-``    `.  `_.  ''-._           Redis 2.8.17 (00000000/0) 64 bit
  .-`` .-```.  ```\/    _.,_ ''-._
 (    '      ,       .-`  | `,    )     Running in stand alone mode
 |`-._`-...-` __...-.``-._|'` _.-'|     Port: 6379
 |    `-._   `._    /     _.-'    |     PID: 8
  `-._    `-._  `-./  _.-'    _.-'
 |`-._`-._    `-.__.-'    _.-'_.-'|
 |    `-._`-._        _.-'_.-'    |           http://redis.io
  `-._    `-._`-.__.-'_.-'    _.-'
 |`-._`-._    `-.__.-'    _.-'_.-'|
 |    `-._`-._        _.-'_.-'    |
  `-._    `-._`-.__.-'_.-'    _.-'
      `-._    `-.__.-'    _.-'
          `-._        _.-'
              `-.__.-'

[8] 25 Feb 16:25:07.349 # Server started, Redis version 2.8.17
Conclusion
But, why even use Org mode for this? Well, the best thing I think
that it has for it is that we are adding value transparently to the
way that we are executing our workloads along with its description.
By having a document format where code blocks are first class citizen,
we can both manipulate the way we run something without losing the
thought process of how we ran it in the first place (since human writing also
first class citizen), thus emphasizing both reproducibility and readability.
Locally, the code blocks would still eval
using the Org mode active document features, but by dispatching it to
something like the OrgBabelScheduler, we can just lift those code blocks and run
them in a distributed fashion.
There are still some ideas I have around this and the possibilites
that it would open around reproducible research.
Feedback is very welcome! You can also follow me on Twitter if you
find this interesting…
25 Dec 2014
One of the features that I have been relying a lot in Go is the type switch.
This feature is specially useful when using interfaces since it helps us avoid having to do type assertions all the time.
A couple of examples below.
Example #1
Let’s suppose that we have 3 types A, B & C,
where each one of these types can be assigned a Name:
package main

import (
  "fmt"
  "reflect"
)

type A struct { Name string }
type B struct { Name string }
type C struct { Name string }
And we put them inside of a slice which can contain interfaces:
func main() {

  a := &A{Name: "A"}
  b := &B{Name: "B"}
  c := &C{Name: "C"}

  t := make([]interface{}, 0)
  t = append(t, a)
  t = append(t, b)
  t = append(t, c)
Without using type switch
We would end up doing something like this:
fmt.Println("--- without type switching")
for _, thing := range t {
  switch thing.(type) {
    case *A:
      fmt.Println(reflect.TypeOf(thing), "is of type A. Name is:", thing.(*A).Name)
    case *B:
      fmt.Println(reflect.TypeOf(thing), "is of type B. Name is:", thing.(*B).Name)
    case *C:
      fmt.Println(reflect.TypeOf(thing), "is of type C. Name is:", thing.(*C).Name)
  }
}
Results
--- without type switching
*main.A is of type A. Name is: A
*main.B is of type B. Name is: B
*main.C is of type C. Name is: C
Using a type switch
Makes things a little more bearable:
fmt.Println("--- type switching on the item")
for _, thing := range t {
  switch o := thing.(type) {
    case *A:
      fmt.Println(reflect.TypeOf(o), "is of type A. Name is:", o.Name)
    case *B:
      fmt.Println(reflect.TypeOf(o), "is of type B. Name is:", o.Name)
    case *C:
      fmt.Println(reflect.TypeOf(o), "is of type C. Name is:", o.Name)
  }
}
Results
--- type switching on the item
*main.A is of type A. Name is: A
*main.B is of type B. Name is: B
*main.C is of type C. Name is: C
Example #2
Let’s see how far we can take it.
Now, let’s suppose that we want to handle A and B the same way.
Using type switch, it works too
Since we want to handle A and B the same way, we could think
that we could group them into the same case, which would work:
fmt.Println("--- Grouping A and B: ")
for _, thing := range t {
  switch o := thing.(type) {
    case *A, *B:
      fmt.Println(reflect.TypeOf(o), "is of type A or B.")
    case *C:
      fmt.Println(reflect.TypeOf(o), "is of type C.")
  }
}
Results
*main.A is of type A or B.
*main.B is of type A or B.
*main.C is of type C.
Until it doesn’t
Let’s suppose that we want to inspect the value of the Name field. Then it breaks:
for _, thing := range t {
	switch o := thing.(type) {
	case *A, *B:
		fmt.Println(reflect.TypeOf(o), "is of type A or B. Name is:", o.Name)
	case *C:
		fmt.Println(reflect.TypeOf(o), "is of type C. Name is:", o.Name)
	}
}
The above would throw the following error:
o.Name undefined (type interface {} has no field or method Name)
Back to interface
What happened here is that by trying to group A, B types, we ended up again
with an interface, so we cannot rely on the first type switch anymore.
We could type switch once more time then:
fmt.Println("--- Double type switch all the way")
for _, thing := range t {
	switch o := thing.(type) {
	case *A, *B:
		switch oo := o.(type) {
		case *A:
			fmt.Println(reflect.TypeOf(o), "is of type A or B. Name is:", oo.Name)
		case *B:
			fmt.Println(reflect.TypeOf(o), "is of type A or B. Name is:", oo.Name)
		}
	case *C:
		fmt.Println(reflect.TypeOf(o), "is of type C. Name is:", o.Name)
	}
}
Results
--- Double type switch all the way
*main.A is of type A or B. Name is: A
*main.B is of type A or B. Name is: B
*main.C is of type C. Name is: C
…which looks a bit messy. A more straightforward way would be to
flinch away our desire to make things “DRY”, still rely on the first type switch
and just repeat more code:
fmt.Println("--- The Go Way™")
for _, thing := range t {
	switch o := thing.(type) {
	case *A:
		fmt.Println(reflect.TypeOf(o), "is of type A or B. Name is:", o.Name)
	case *B:
		fmt.Println(reflect.TypeOf(o), "is of type A or B. Name is:", o.Name)
	case *C:
		fmt.Println(reflect.TypeOf(o), "is of type C. Name is:", o.Name)
	}
}
…which results in:
--- The Go Way™
*main.A is of type A or B. Name is: A
*main.B is of type A or B. Name is: B
*main.C is of type C. Name is: C
Progress so far
So which one of the approaches is better?
I would say that probably the one with the
multiple case statements where the same line is repeated, since when
we type switch and have a case statement with one more type,
we end up once again with an interface, and we need yet another type switch
for it that generates more code which more or less says the
same thing, so it seems that it is about as DRY as it could get
for now using only type switch.
Link to the Go playground with the example
To solve the grouping problem, there is something else that we can
try besides only using the type switch, which is using interface types.
Example #3
Another alternative would be to use a Nameable interface when creating the slice.
This means first having to declare something like this:
type Nameable interface {
  GetName() string
}

type BasicAttrs struct {
  Name string
}

// Code generation could help with this...
type A struct { BasicAttrs }
func (o *A) GetName() string { return o.Name }

type B struct { BasicAttrs }
func (o *B) GetName() string { return o.Name }

type C struct { BasicAttrs }
func (o *C) GetName() string { return o.Name }
So that we can later on use it as follows:
func main() {

	a := &A{BasicAttrs:BasicAttrs { Name: "A" }}
	b := &B{BasicAttrs:BasicAttrs { Name: "B" }}
	c := &C{BasicAttrs:BasicAttrs { Name: "C" }}

	t := make([]Nameable, 0)
	t = append(t, a)
	t = append(t, b)
	t = append(t, c)

	fmt.Println("--- The correct Go way?")
	for _, thing := range t {
	switch o := thing.(type) {
	   case *A, *B:
	      fmt.Println(reflect.TypeOf(o), "is of type A or B. Name is:", o.GetName())
	   case *C:
	     fmt.Println(reflect.TypeOf(o), "is of type C. Name is:", o.GetName())
	  }
	}
}
Results
--- The correct Go way?
*main.A is of type A or B. Name is: A
*main.B is of type A or B. Name is: B
*main.C is of type C. Name is: C
Is this better?
I think so. Even though the implementation is a bit more verbose, the last example using a type interface
might be the way to go in case we face the grouping issue from the raw interface.